Sanitation Storage Solutions: Septic Tank Solutions

Store and dispose of sewerage with our Septic Tank Solutions.

Septic Tank Solutions

A septic tank is used for the disposal of sewerage only. It brings about the digestion of organic matter and discharges the black water into a French drain to soak away into the ground over time. It requires minimum maintenance, as each component has a specific function and is designed accordingly.

Septic Tank Benefits

  • Minimum maintenance
  • Simple & effective on-site black water treatment
  • Treats effluent naturally
  • Lessens the risk of raw sewerage discharging from treatment plants
  • Long service life & low operating costs

System Components

Septic-Tank-System-Components

1. Tank

Septic tank in required size. Standard fittings (fitted inlet and outlet) are included in the price.

The volume required will depend on how many people will use the facilities on a daily basis:

PeopleTank Size
2 – 41 250lt
2 – 61 500lt
4 – 61 750lt
4 – 72 000lt
4 – 92 500lt
20 – 256 000lt

2. Pipes – 110 mm SV pipes

Lengths will vary based on the installation.
2a. From feed from house to the first elbow
2b. From first elbow into the tank

3. Elbow – 110 mm

According to pipes

4. French drain

Size and backfill material will vary based on installation and preference.
4a. Corrugated iron (size according to the hole)
4b. Stones/rocks that cannot disintegrate/crumble or car tyres

Note

This is a guideline for a basic installation. Each installation will vary based on the setup and personal preference. It is advised to make use of a professional for an installation of this complex.

Maintenance

Although septic tanks are fairly maintenance-free, there are a few things you can do to ensure that your system functions properly.

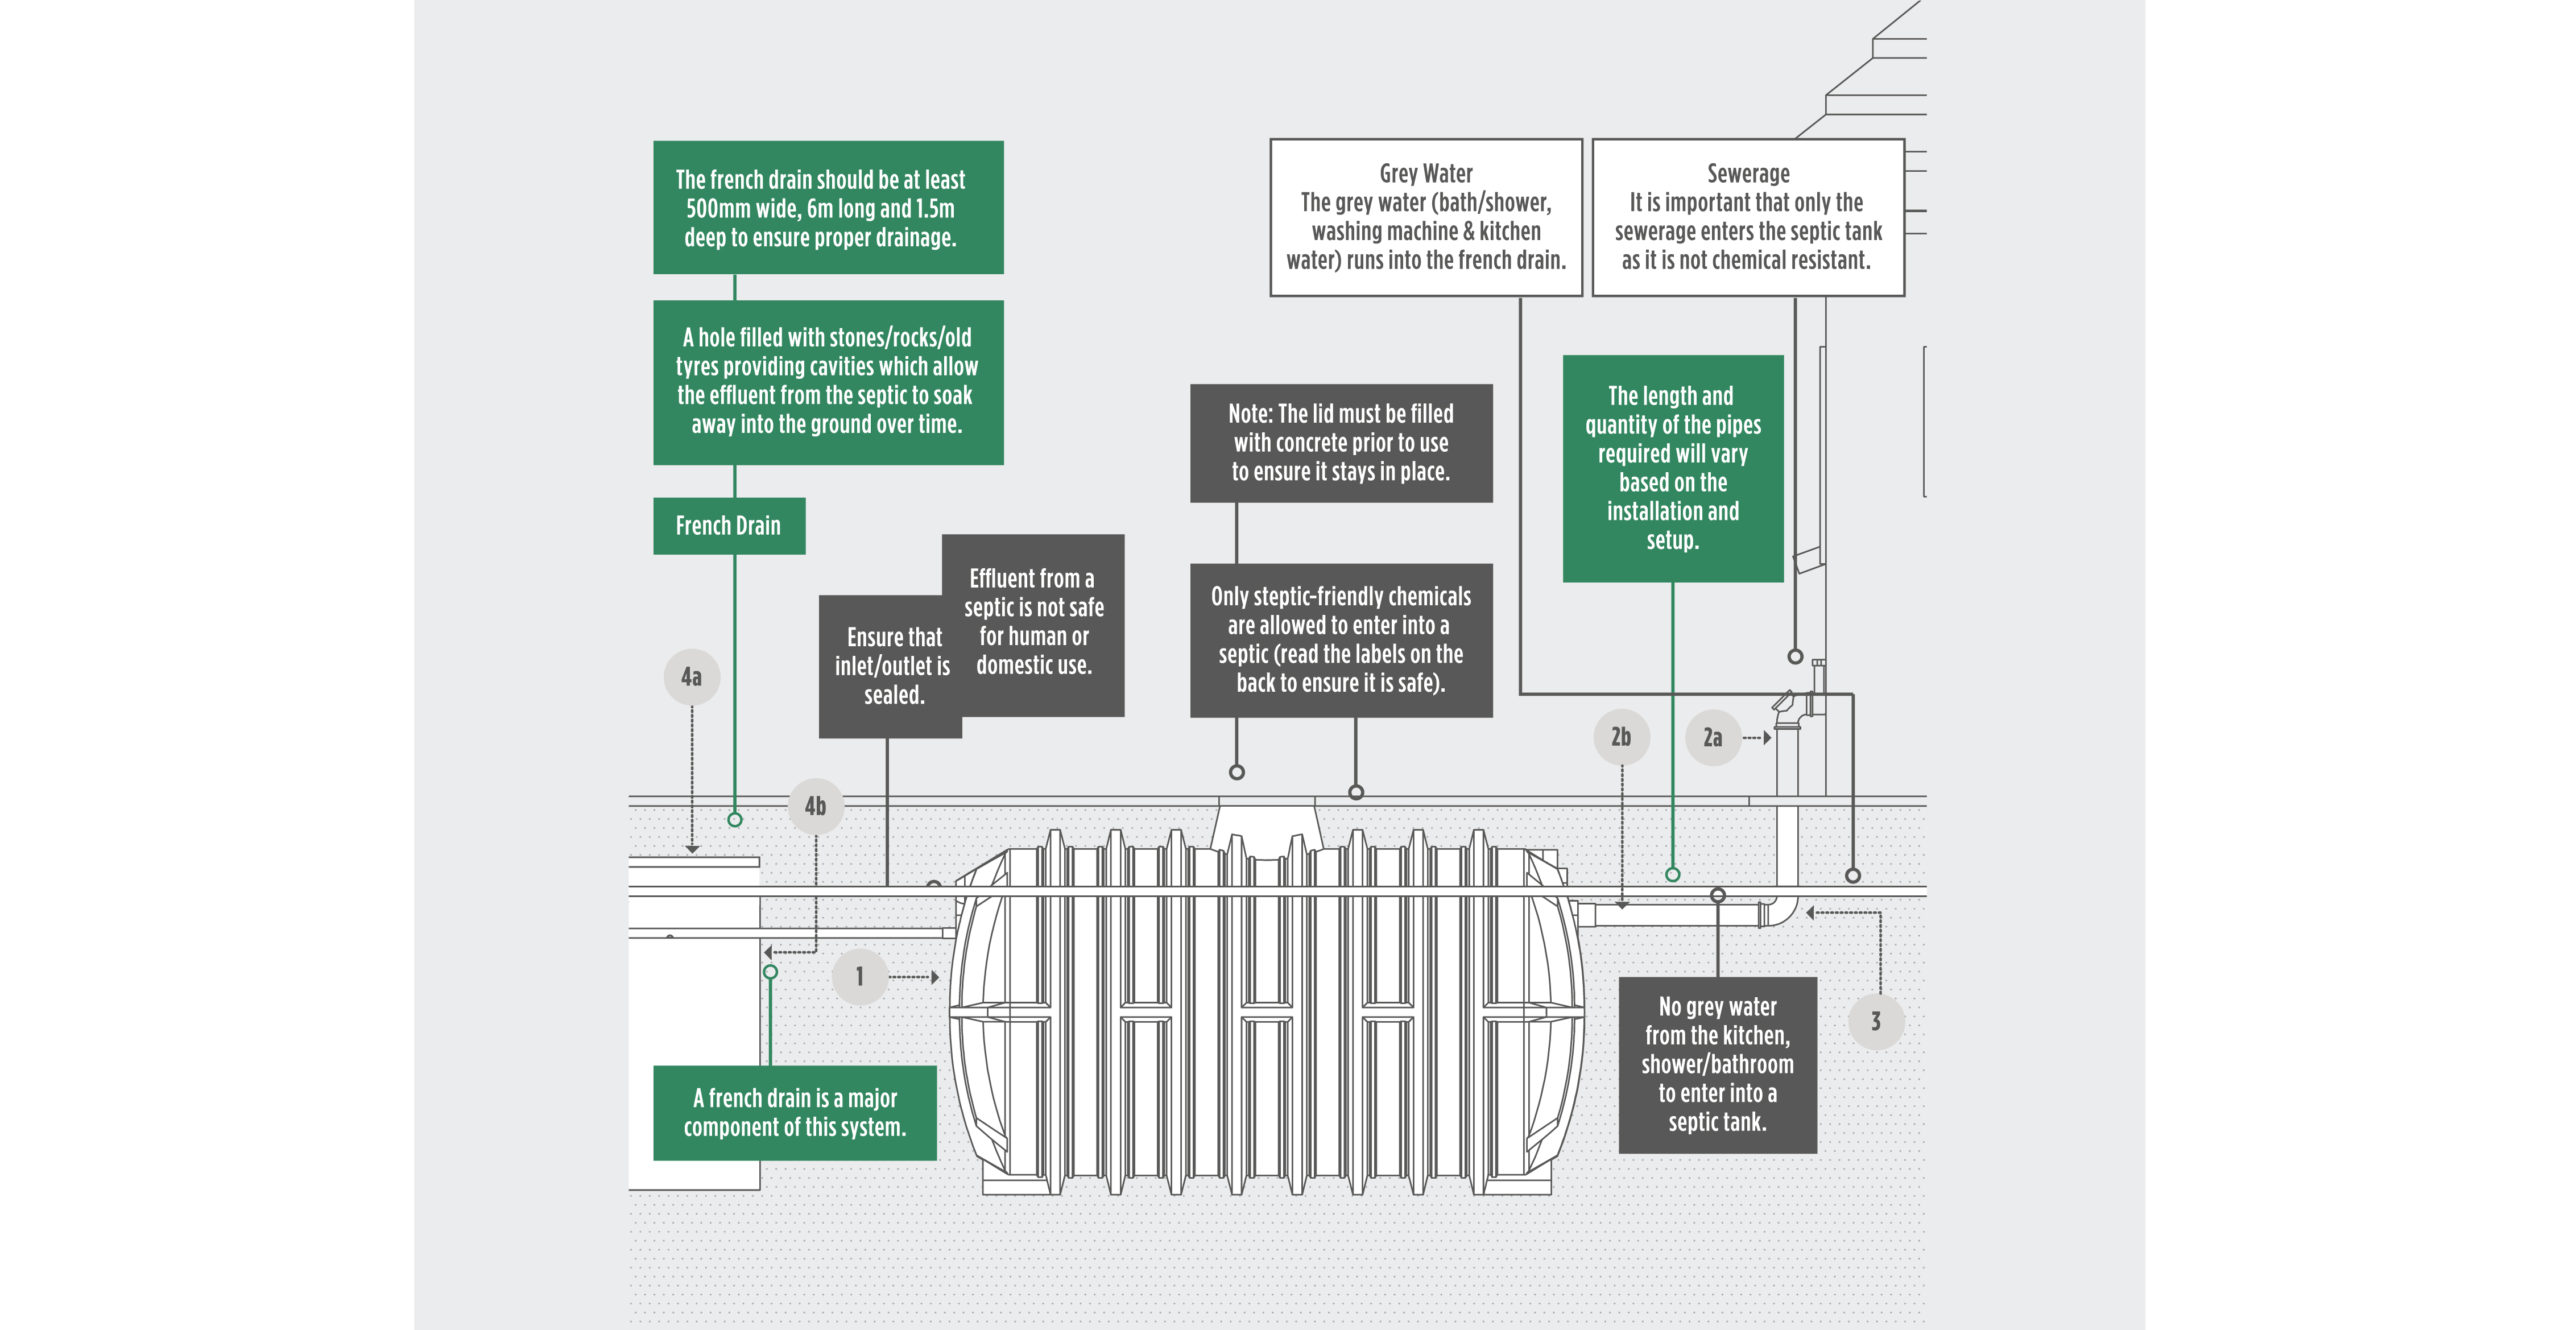
1. Use septic-friendly chemicals only.

It is important that only septic-friendly chemicals are used to clean all toilets feeding into the tank, as septic tanks are not chemical-resistant. Chemicals can also kill the bacteria that help break down the solids. Septic-friendly chemicals can be identified by viewing the labels on the back of products. Note: one teaspoon of dishwashing liquid can result in system failure for up to seven days.

2. Use septic-safe toilet paper.

3. Don’t flush non-biodegradables down the toilet.

Avoid flushing any non-biodegradable objects down the toilet, as this can clog the tank and drain field.

4. Ensure lid remains in place.

When installing the tank, the lid is filled with concrete prior to use to ensure it stays closed off. It is, however, important to double-check every now and then to make sure that nothing falls into the tank and no effluent leaks out of the tank (effluent is not safe and carries disease-causing germs).

5. Keep a watchful eye

If you notice any of the following warning signs, contact a professional septic company/preferred installer immediately for assistance:

  • Surfacing sewerage or wet spots
  • Gurgling sounds in the plumbing system
  • Slow draining fixtures

Installation guide

PRE-INSTALLATION: PART 1

1. Tank placement

The location of a septic tank should be considered and it must be placed on soil with a bearing capacity greater than 120 kPa.

Avoid installing the tank:

  • In water-saturated clay or an area that is frequently flooded
  • Where depth to bedrock is less than 2.5m
  • In the path of vehicles/heavy equipment
  • Where underground services are expected (i.e. electric cables, water and sewer pipes, gas lines, etc.)

2. Soil Classification

If bearing capacity cannot easily be determined, use the provided method of soil classification, which will also assist in determining suitable backfill material.

CategoryBearing CapacityVisual AppearanceSqueezed in hand & pressure released
RockYesSufficient– Rock, Slate, Shale etc.
Coarse-grained soil: GravelYesSufficient– Coarse to very Coarse
– Small stones & particles
– Free-flowing
Coarse-grained soil: SandYes
No
-Coarse/medium sand is Sufficient
-Fine sand is NOT Sufficient
– Granular appearance (individual grain sizes detectable)
– Free-flowing when dry
– Lighter to brownish colours
– Won’t form a cast when dry & falls apart
– Wet cast crumbles when lightly touched
Fine-grained soil: SiltNo– NOT Sufficient– Very little fine sand
– Cloddy when dry & soft flourlike feel
– Readily pulverises to powder
– Darker colours (green, blue & black)
– Cast can be handled without breaking
– Readily puddles when wet
Fine-grained soil: ClayNo– Hard homogeneous clay may be Sufficient
– clay is mostly NOT Sufficient
– Fine textured, breaks into very hard lumps when dry
– Difficult to pulverise into soft flourlike powder
– Cohesive when moist & shrinks when drying
– Darker colours (green, blue, black & orange)
– Cast can be freely handled without breaking
Highly organic soilNoNOT Sufficient– High organic content (often decomposed)
– Plant remains/woody structure easily recognised
– Mineral soil finely divided with fibrous remains
– Occur in lowlands, swamps & swales
– Dark or black in colour

PRE-INSTALLATION: PART 2

1. Excavation Process

When excavating be aware of:

a. The surroundings
Take care not to damage any underground services (telecommunication, electrical cables, water/sewer pipes, gas lines, etc).

b. The natural elements
If ground water is present in the excavation hole, continuously pump out the water during the installation process.

LOCATIONDESCRIPTIONEXCAVATION DEPTH
Soft in-situ soil– Fine sand, silt or clayMin 420mm/max 720mm deeper than the tank’s height
Non-load bearing– No ground water will affect the tank
– No traffic will pass over the site
Min 120mm/max 720mm deeper than the tank’s height
Load bearing– Ground water will affect the tank
– Traffic will pass over the site
Min 420mm/max 720mm deeper than the tank’s height

2. Prepare the tank bed

The bedding is the foundation on which the tank will be installed. The type and thickness of bedding will vary, choose the correct process relevant to your setup.

TYPETHICKNESSPROCESS
a. Rocks/Rocky soils– Minimum 150mm crusher dust or a coarse sand/gravel mixture
– Bedding to be thicker where hollows or uneven areas are levelled out
– Remove all large/loose rocks and objects that could interfere
b. Dry installation
Gravel/Coarse sand (no ground water)
– 150mm crusher dust or a coarse sand/gravel mixture
– Stabilise bedding layer with 3% cement (1½ bags 50kg cement)
– Spread cement evenly and compact, using mechanical compactor
– Do no wet cement, as the natural moisture from the ground will do this over time
– If the soil is too dry to form a lump when pressed in your hand, add a little water but ensure lump still crumbles when lightly touched
c. Dry installation
Soft in-situ soil – fine sand, silt or clay (no ground water)
– 2 x layers of 150mm crusher dust or a coarse sand/gravel mixture each
– Stabilise bedding layer with 3% cement (1½ bags 50kg cement)
– Spread cement evenly and compact, using mechanical compactor
– Do no wet cement, as the natural moisture from the ground will do this over time
– If the soil is too dry to form a lump when pressed in your hand, add a little water but ensure lump still crumbles when lightly touched
d. Wet installation (ground water will affect the tank) – Drainage bedding layer of 150mm crushed rock (19mm), use crusher dust or a coarse sand/gravel mixture
– Stabilise bedding layer with 3% cement (1½ bags 50kg cement)
– Spread cement evenly and compact, using mechanical compactor
– Do no wet cement, as the natural moisture from the ground will do this over time
– If the soil is too dry to form a lump when pressed in your hand, add a little water but ensure lump still crumbles when lightly touched

2. INSTALLATION

Septic-Tank-Installation-Step-One

Dig a hole for the French Drain. The hole should be approximately
1 meter away from the designated area for the septic tank.

Note: the larger the hole the better.

Septic-Tank-Installation-Step-Two

Carefully place the tank on top of the prepared bedding in the designated excavated area.

Note: the direction of flow (inlet and outlet) and place according to setup.

Septic-Tank-Installation-Step-Three

NB: the backfill procedure differs based on the size of the septic tank used.

It is vital to follow the correct procedure to ensure the tank does not get damaged (see steps 4 to 5).

Septic-Tank-Installation-Step-Four

For the 6000L tank – fill the tank with 150mm of water, then backfill 150mm around the
perimeter of the tank. Compact the layer and repeat the process until at least half of the hole is filled.

Septic-Tank-Installation-Step-Five

For the smaller range – fill the entire tank with water, then backfill in layers of 150mm around the
perimeter of the tank, compacting each layer before laying the next. Continue until halfway.

Septic-Tank-Installation-Step-Six

a. Connect a 110mm pipe from the sewerage feed (in house) to the supplied inlet on the tank.
b. Extend grey water feed past the tank and into the French Drain, NOT INTO THE TANK.

Septic-Tank-Installation-Step-Seven

Connect a 50mm pipe (6m long) to the supplied outlet and extend into the French Drain.

Septic-Tank-Installation-Step-Eight
Drill a few holes into the bottom end of the 50mm pipe starting 1m away from
the outlet and spaced approximately 200mm apart.

Note: the holes will ensure effective drainage.

Septic-Tank-Installation-Step-Nine
Fill tank lid with concrete (allow concrete to cure) and put the lid in place.

Septic-Tank-Installation-Step-Ten
Backfill the rest of the hole with suitable backfill material.

Refer to steps 4 to 5 to ensure correct procedure is followed based on the size of the tank used.

Septic-Tank-Installation-Step-Eleven

Fill the French Drain with either stones/rocks or old car tyres. Be careful not to cause damage to
the outlet pipe and its connection to the tank. Place corrugated iron over the hole and cover it with soil.

Septic-Tank-Installation-Step-Twelve

Place a bacteria starter pack into the septic tank to start the fermentation process
(bought at a local co-op/camping store). Alternatively, a piece of rotten meat is just as effective.

Dressing_Sanitaion
 

The dressing over the tank will depend on various conditions.

Use the table above to assist with the appropriate dressing relative to the setup.