Water Storage Solutions: Fully Integrated System

This system combines municipal water and rainwater for a full domestic supply.

Fully Integrated Water Storage Solution

A combination of rainwater harvesting and municipal backup, our Fully Integrated System is the most sophisticated in the range. The tank is filled with a pre-determined level of municipal water that serves as a permanent backup, while offering the added benefit of harvesting rainwater. The water is then filtered, sterilised and utilised as a full domestic water supply.

Fully Integrated System Benefits

  • Combination of both municipal backup & rainwater harvesting

  • Ensures water is always available

  • Tank filled with municipal water (pre-determined min. level required)
    and rainwater (remaining space)

System Components

Fully-Integrated_Main-Image_New

1. Tank

2. Base / foundation

3. Pre-filtration

3a. Tank Filter Screen – fitted beneath the lid
3b. Rainhead
3c. First Flush Rainwater Diverter

4. Pump and pump cover

When choosing a water pump, it is important to consider the water source, the application and the pressure required to ensure that the pump will meet your requirements. 

To ensure all connections are visible, a pump cover was not included in this illustration, but we do recommend using a pump cover to protect your pump from the elements.

For more information, refer to our pump range section here.

5. Pump to tank connector kit

An all-inclusive kit that permits seamless connection from the tank to both our 0.37kW and 0.75kW VSD Booster Pumps. Important: if our pump to tank connector is not used for connection from your tank to your pump, you will require 25mm diameter (minimum) pipe for this connection, as well as a gate/ball valve between your tank and your pump to isolate the water supply as and when needed.

6. Pipes – standard PVC pipes in 110, 80 or 75mm

For more detail, refer to the Rainwater Harvesting Components section here.

7. Pipes – for municipal backup connection

For more detail, refer to the Municipal Backup Components section here.

8. Elbows

8a. 110, 80 or 75mm depending on pipe sizes
8b. Sizes according to pipes

9. Ball valves

To isolate components and manage the system.

10. Non-return Valves

11. Float valve kit

To control the fill height of the tank.

12. Filtration

Rainwater that is utilised for full domestic supply needs to be filtered to potable drinking water standards. It needs to be able to remove sediment, particulates and contaminants such as bacteria and any other potentially harmful substances that could be present in the water.
For more information and detailed installation instructions, refer to our filtration range section here.

Note

This is an example of a basic Municipal Backup System. Each installation will vary based on the setup and your personal preferences. It is advised to make use of a plumber/professional installer as the system is required to tie into the building’s main water supply line. To find an installer in your area click here.

Maintenance

In order to prolong your system’s life, reduce the potential for damages and ensure you enjoy maximum benefits, there are some things that you should undertake regularly:
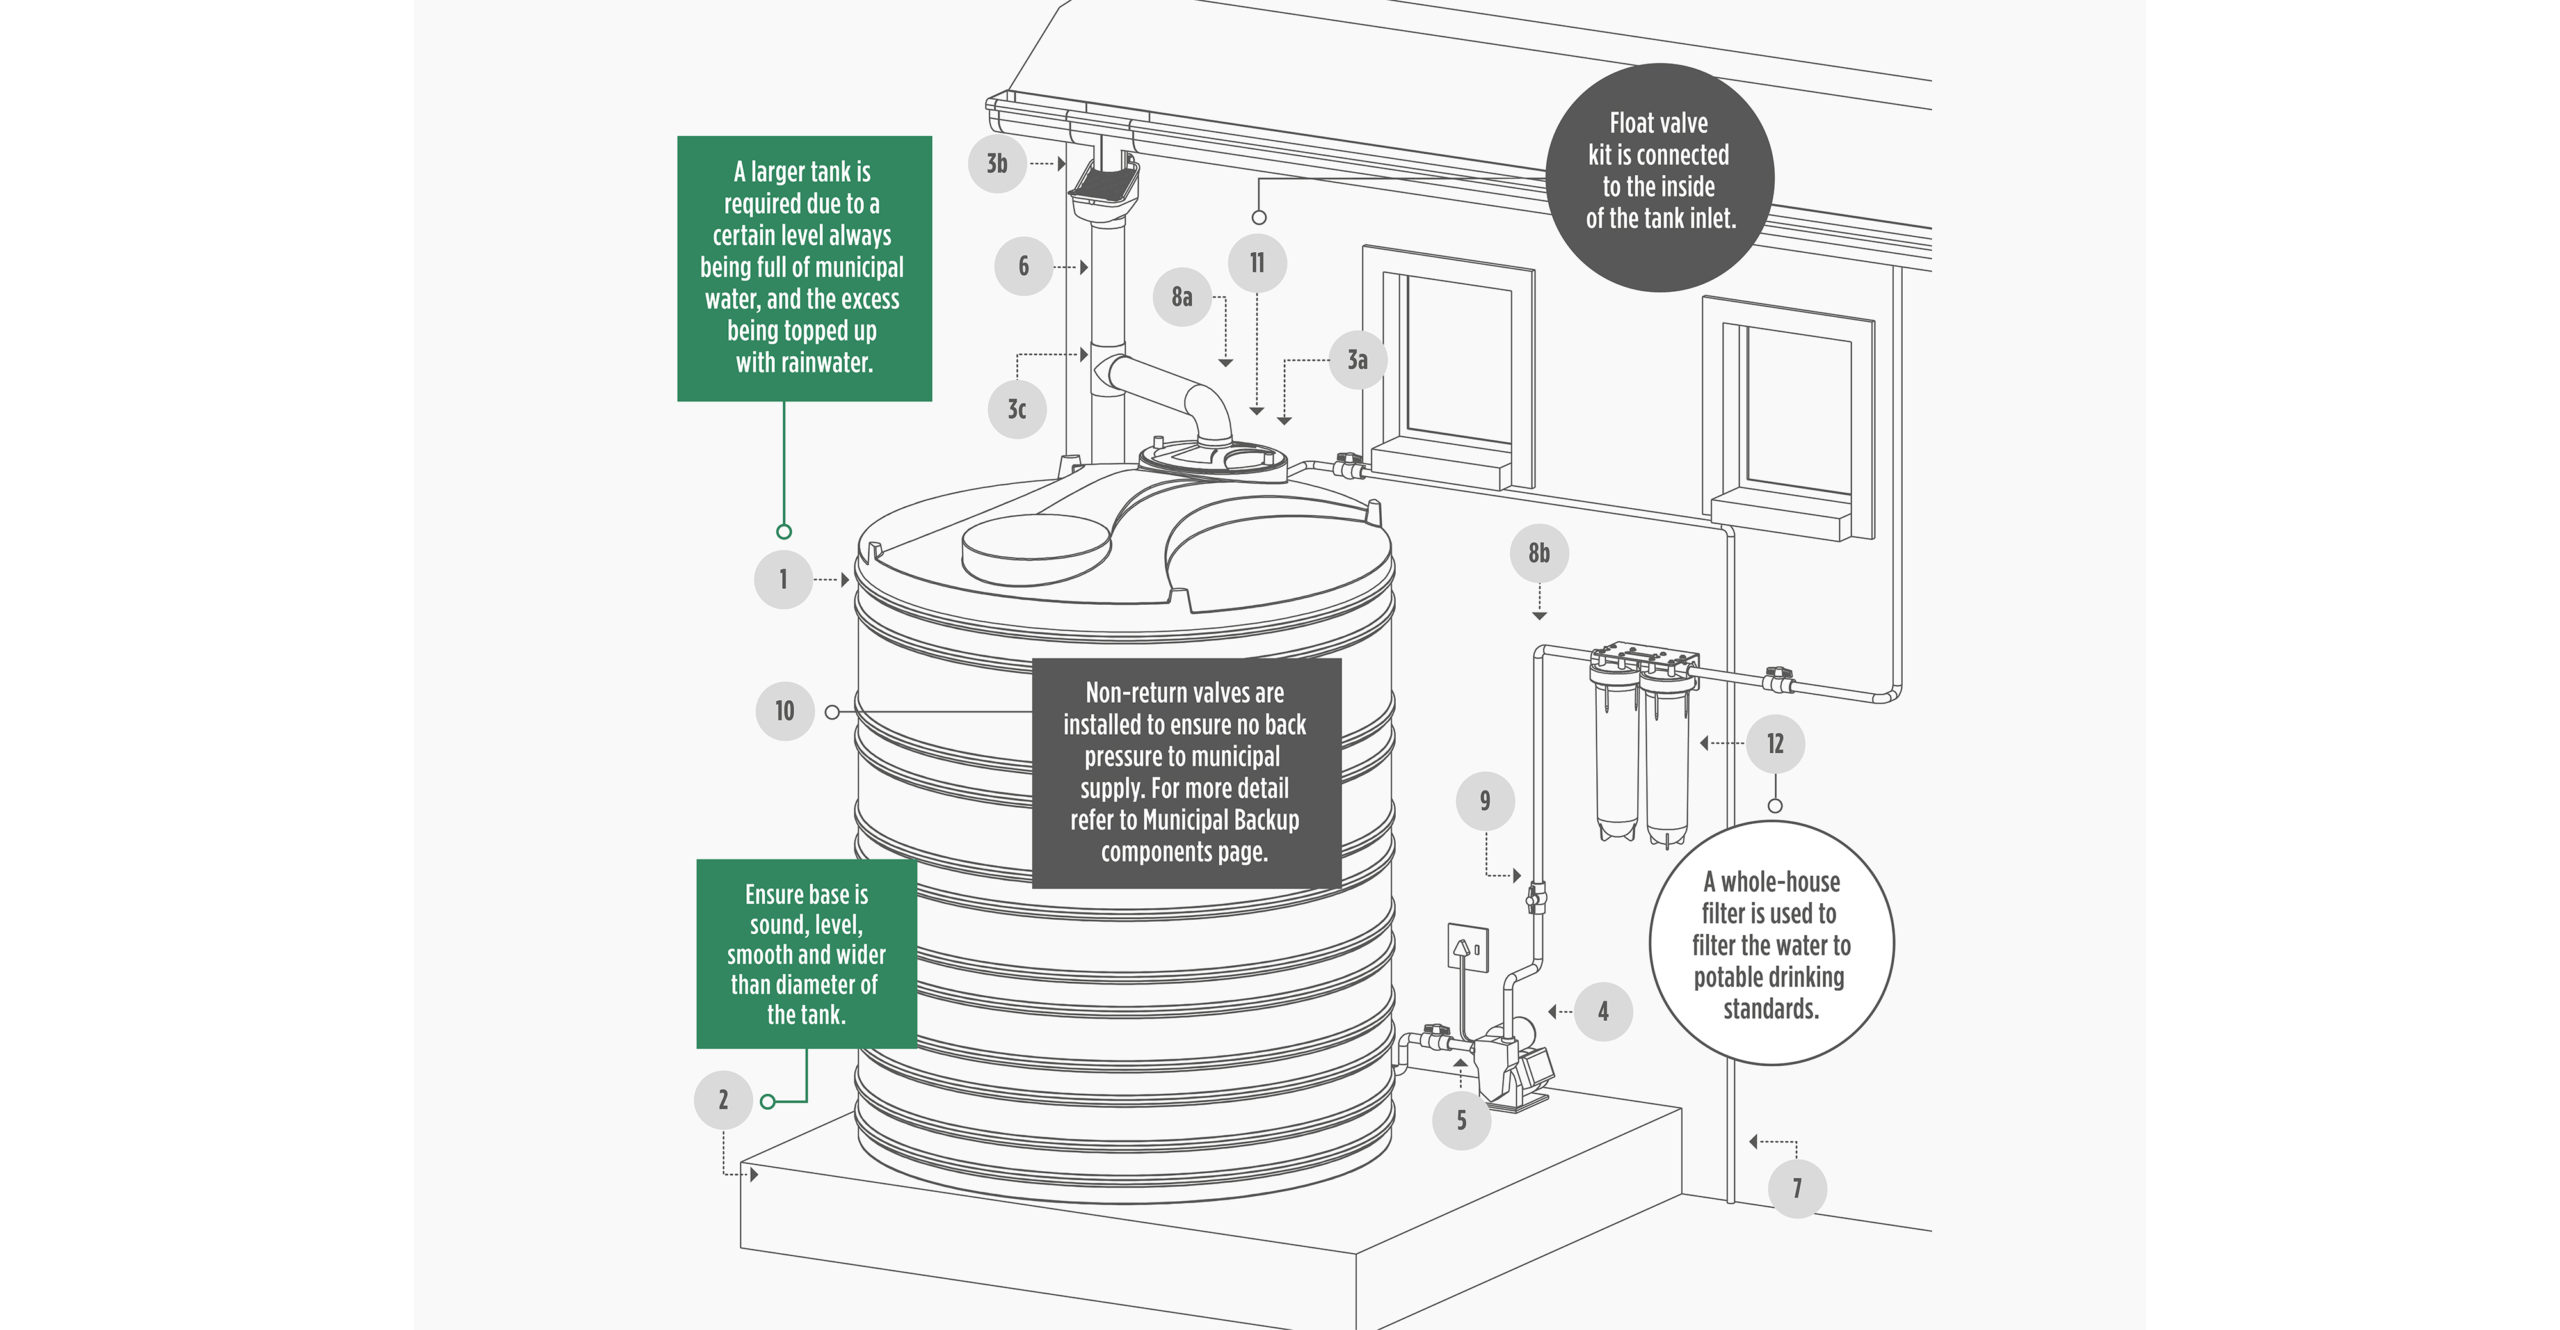
1. Rooftops

Your rooftop should be cleaned regularly to avoid contamination of the runoff. Dust, leaves, animal excrement and dead insects accumulate on the roof during dry weather. It is therefore important to make sure that the roof is cleaned before the rainy season starts, followed by a monthly check to keep it clean.

2. Overhanging branches

Ensure that branches overhanging the roof are regularly trimmed back.

3. Gutters

Ensure that gutters are free from leaves. It is a good idea to consider installing gutter mesh.

4. Pre-filtration

Regularly check the pre-filtration device(s) to ensure that it is free from leaves and that rainwater is able to pass through.

5. First Flush Diverter

If a First Flush Diverter is installed, check and clean it out on a monthly basis. Ensure that the diverter is dripping out sufficiently in order to reset the system.

6. Keeping your tank clean

Inspect the inside of your tank every 3 months to make sure that leaf litter has not built up at the bottom of the tank. A properly designed system should not allow leaves and other material to enter the tank.

7. Water Quality

Remember that water collected from your roof will not be clean. If you intend to use the rainwater for drinking purposes, consult an installer with experience in installing water filtration systems. For irrigation purposes, however, this water is ideal.

8. Filters

If any filters are installed before or after the pressure pump and/or water tank, please ensure that they are cleaned and/or replaced as per the installer and manufacturer recommendations.

9. UV-light

If a UV-light is installed, make sure to replace the globe as per the manufacturer recommendations.

Tank-Maintenance-Icon

Installation guide

1. PRE INSTALLATION

1. Choose a tank

Tank size required for Fully Integrated System = rainwater harvesting calculation + municipal backup calculation.

Calculation for rainwater harvesting:

1mm of rain on 1m2 of roof surface = 1 litre of water

Example: Roof area of 100m2 = 2500 litres in a rainfall event of 25mm

Alternatively, you can use the below size guidelines:

ROOF P/M2TANK SIZE
50 – 100750L – 2400L
100 – 300+2700L – 10 000L

Calculation for municipal backup.

Size of tank = litres p/day X total days back up required
i.e. 4 x people (600L) X 3 days = 1800L

PEOPLELITRES P/DAY
1150
2300
3450
4600
5750

2. Tank placement

Will depend on space available plus access to suitable guttering/downpipes and main incoming water supply line.

3. Base/foundation options

Tanks must be installed on a sound, level and smooth surface. Level paving will suffice, or a properly designed tank stand. Alternatively a concrete slab needs to be built, ideally with a concrete surface bed at least 85mm thick.

Recommended base sizes are:

It is recommended that the foundation should be at least 100mm wider than diameter of tank.

TANKDIAMETERBASE
750lt760mm860mm
1500lt1410mm1510mm
2400lt1420mm1520mm
2700lt1420mm1520mm
5250lt1820mm1920mm
10 000lt2200mm2300mm

2. INSTALLATION

FI_Overview

1.FI_Base

Ensure tank is installed on a suitable base. The base must be sound, level, smooth, free of any protrusions
and at least 100mm wider than the base of the tank (refer to pre-installation).

2.FI_Pre-filtration

Select desired pre-filtration options. Pre-filtration will differ depending on preference
and what the water will be used for.

3.FI_Pre-filtration-1

Install desired pre-filtration. For detailed instructions refer to steps 3 to 4 on
Rainwater Harvesting Installation section here.

4.FI_Cut-hole-in-lid

Cut a hole of 110.5mm in the middle of the lid and fit the pipe through the hole,
stopping before the tank filter screen.

5.FI_Plumber-Instructions

For detailed plumbing instructions please refer to steps 2 to 5 on Municipal Backup Installation section here.

6.FI_Install-Filtration-Unit_2

Install a Whole-house Filter with a Disruptor cartridge between the pump and
the house to ensure your water is safe for consumption.